
In addition to the network settings required for standard video meetings (regardless of your provider), Google Beam requires specific network support to enable 3D meetings. This page explains the network requirements and how to validate that your network settings meet them to ensure Beam 3D meetings are a smooth and high-quality meeting experience.
Task checklist
These tasks must be completed to ensure the network connections and performance needed for Beam. Each item links to the relevant section.
| Confirm your network meets bandwidth and performance minimums. | |
| Confirm required network architecture such as a dedicated virtual local area network (VLAN) without VPNs or proxies. | |
| Verify IP address configuration: IPv4 only, DHCP or static. | |
| Configure firewall rules to permit outbound connections to official Google IP address ranges, egress ports, and server name indication (SNI) hostnames | |
| Configure firewall for standard video conferencing with Google Meet or Zoom Rooms, depending on your license. | |
| Set up a hostname allowlist for ChromeOS devices. | |
| Set up a hostname allowlist for the touchscreen. | |
| Test your network to ensure it meets requirements. |
Bandwidth and network performance
To run 3D video conferencing meetings, ensure your network meets the following requirements:
| Requirement | Value |
|---|---|
Minimum Sustained Bandwidth |
50 Mbps (upload and download) for 3D video conferencing 3.6 Mbps (upload and download) for standard video conferencing (HD) 1.7 Mbps (upload and download) for standard video conferencing (SD) |
Link speed |
At least 1Gb/s |
Latency |
100 ms or less (to or from Beam endpoints) |
Jitter |
40 ms or less |
Packet loss |
1% or less |
Your network should have enough bandwidth for multiple HD video meetings and extra bandwidth for other needs, such as live streaming. Number of participants, screen sharing, and other factors also affect bandwidth usage.
If your available bandwidth falls below 50 Mbps, the quality of 3D meetings can be reduced. Here's a breakdown of the potential impact:
- Around 10 Mbps: 3D video can be degraded.
- Around 5 Mbps: 3D video is turned off entirely, audio quality can be degraded, and the frame rate can be reduced.
Jitter
Inconsistency in arrival times can make it difficult for the receiving end to smoothly reconstruct the original data stream. Jitter above 40 ms can lead to choppy video, distorted audio, and dropped connections.
Packet loss
Packet loss higher than 1% can manifest as choppy video, missing audio segments, or even dropped connections.
Network architecture and NAT requirements
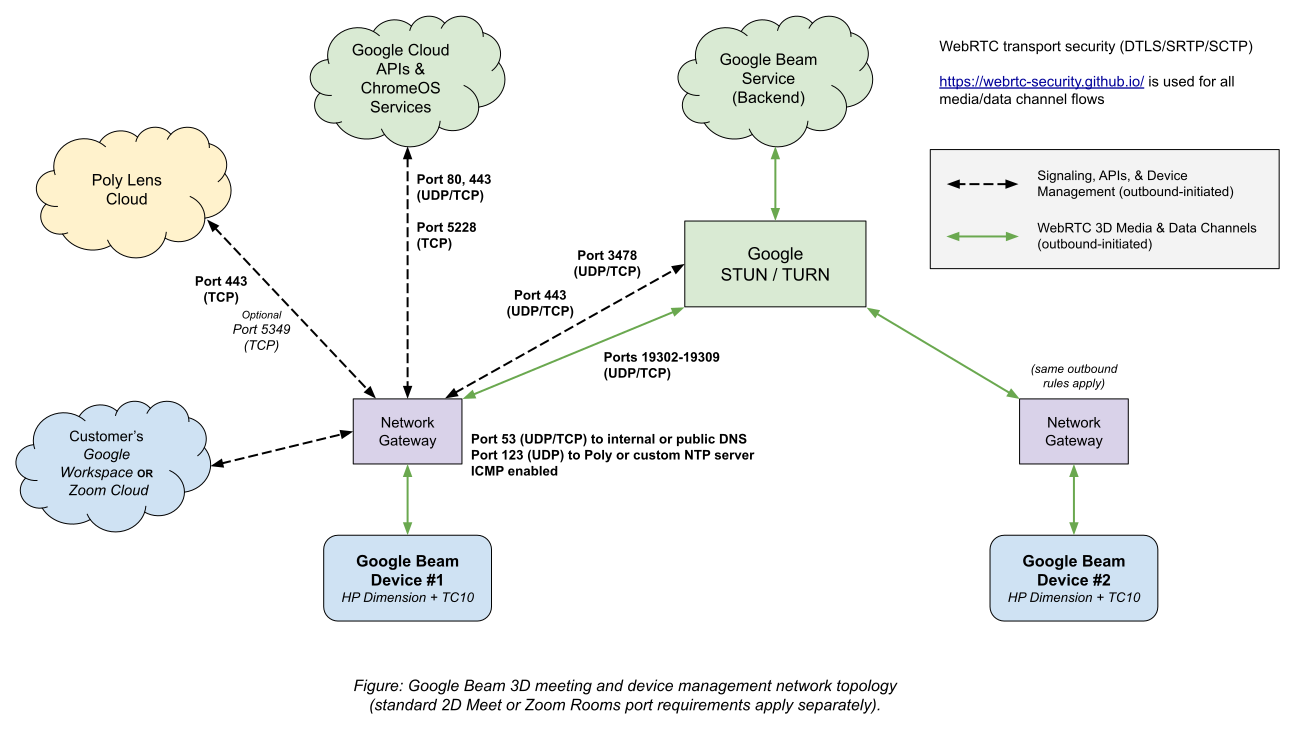
Your HP Dimension devices require a wired Ethernet connection; Wi-Fi isn't supported. They communicate with Google services using outbound web connections. To ensure optimal performance, security, and bandwidth isolation, configure your network according to the following rules:
- Dedicated VLAN: Place all Beam-enabled devices on a dedicated internal Virtual Local Area Network (VLAN) and apply the specific egress firewall rules listed later in this page. Isolating the devices shields Beam's 3D spatial video streams (up to 50 Mbps up/down per active device) from latency spikes and packet loss caused by traffic on the general office LAN.
- NAT and IP addressing: Beam-enabled devices can operate on standard internal subnets behind IPv4 Network Address Translation (NAT) with internet access. A 1:1 public IP address isn't required.
- No VPN or proxy: Avoid using VPNs or proxy servers for Beam traffic. Both add latency and can cause a reduction in video and audio quality. Also avoid firewall tasks such as periodic background processing and scheduled maintenance that could cause temporary performance degradation.
- Network redundancy: For added resiliency, use network redundancy (automatic failover to secondary in case the primary fails) on the WAN link.
- ICMP: Enable Internet Control Message Protocol (ICMP) on your network. Most networks have it enabled by default, but if you're on a restricted network, you might need to check with your network administrator.
IP address configuration
Note: This section only applies to the HP Dimension. The touchscreen has its own DHCP network settings and you shouldn't change them.
To assign IP addresses, use automatic DHCP or static IPv4 assignment. Beam only supports IPv4 and IPv4/IPv6 mixed mode.
- DHCP (default): By default, Beam-enabled devices automatically get an IP address, subnet mask, default gateway, and DNS server addresses from DHCP when they start.
- Static IP assignment: If your network policy requires static IP addresses, you can manually configure static network parameters on the device during initial enrollment and setup. Static assignment requires a reserved IPv4 address, subnet mask, and default gateway.
Firewall rules and port requirements
Important: The default domain IP ranges used by Google APIs and services are allocated dynamically and change often. Before opening specific egress ports, verify that your network firewall permits outbound connections to Google's official IP address ranges:
After confirming endpoint accessibility, configure the egress port rules listed in the following table:
| Ports | Type | Purpose |
|---|---|---|
| 53 | TCP and UDP | DNS resolution |
| 80 | TCP and UDP | HTTP web traffic |
| 443 | TCP and UDP | HTTPS (web traffic and user authentication) |
| 3478 | TCP and UDP | WebRTC and TURN |
| 5228 | TCP | Google updates |
| 19302–19309 | TCP and UDP | WebRTC |
Google IP address ranges
If your organization restricts outbound traffic or performs Server Name Indication (SNI) inspection, configure your firewall or proxy to allow the following IP address ranges, ports, and SNI hostnames:
| SNI or hostname | Ports and protocol | IPv4 and IPv6 range | Purpose or service |
|---|---|---|---|
| *.googleapis.com | TCP and UDP 443 | N/A | Google services |
| *.gvt1.com | TCP and UDP 443 | N/A | ChromeOS system updates Note: *.gvt1.com might resolve to ISP-hosted Google Global Cache IPs outside of goog.json; allow by SNI/hostname |
| projectstarlinecallaccess.pa.googleapis.com projectstarlinesession-pa.googleapis.com |
TCP and UDP 443 | N/A | Google Beam service |
| logging.googleapis.com | TCP and UDP 443 | N/A | Logging |
| monitoring.googleapis.com | TCP and UDP 443 | N/A | Monitoring |
| storage.googleapis.com | TCP and UDP 443 | N/A | Storage |
| clients3.googleapis.com | TCP and UDP 443 | N/A | Device management |
| workspace.turns.goog | TCP and UDP 443 | 74.125.250.0/24 2001:4860:4864:5::/64 |
Workspace media relay |
| meet.turns.goog | TCP and UDP 443 | 142.250.82.0/24 2001:4860:4864:6::/64 |
Meet media relay |
| N/A | TCP and UDP 3478 | 74.125.247.128/29 2001:4860:4864:4:8000:: |
TURN and STUN services |
| ntp.polycom.com | UDP 123 | N/A | Poly NTP server |
| mtalk.google.com alt1-mtalk.google.com |
TCP 5228 | N/A | Google updates |
Set up standard video conferencing settings
Each video conferencing platform requires access to certain ports and endpoints. If you haven't already, set up your network to allow access.
Click the tab that corresponds to your license.
Google Beam for Meet
Follow the instructions in Prepare your network for Meet meetings and live streams to set up the network for Meet.
Google Beam for Zoom
Follow Zoom network firewall or proxy server settings to configure egress for Zoom Cloud services. In that guide, the following sections apply to Beam:
- Firewall rules for Zoom: Web authentication and signaling (*.zoom.us, *.zoom.com)
- Firewall rules for Zoom Meetings and Webinars: Core meeting signaling (TCP 443, 8801, 8802) and real-time audio and video media (UDP 3478, 3479, 8801–8810)
- Firewall rules for certificate validation: Certificate revocation checks (CRL and OCSP) over HTTP (port 80) to public certificate authorities (for example, DigiCert or Entrust)
- Firewall rules for Zoom CDN: Web assets and resource delivery for Zoom Room hardware (TCP and UDP 443)
- Firewall rules for Zoom Device Management (ZDM): zdmapi.zoom.us
- IP range .txt files: Downloadable IP feeds such as Zoom.txt if using automated address groups in your firewall
Set up ChromeOS networking requirements
Beam is built on ChromeOS and requires your network to also
meet ChromeOS networking requirements. Review the requirements at
Set up a hostname allowlist for Chrome devices
on TCP and UDP port 443 (plus TCP port 80 for the http:// captive portal
check URLs).
Set up touchscreen settings
The Poly TC10 touchscreen used with the HP Dimension has its own requirements. Allow the hostnames listed in the HP documentation for Poly Lens network devices to ensure that the touchscreen works properly.
Test your network
Network latency
To measure your network latency and ensure it meets the requirements for optimal video conferencing, follow these steps:
Run the
pingcommand: From a computer on the same wired network connection you'll be using for video conferencing, open a terminal or command prompt and run the following command:> ping 74.125.247.128 PING 74.125.247.128 (74.125.247.128): 56 data bytes 64 bytes from 74.125.247.128: icmp_seq=0 ttl=56 time=21.706 ms 64 bytes from 74.125.247.128: icmp_seq=1 ttl=56 time=14.054 ms 64 bytes from 74.125.247.128: icmp_seq=2 ttl=56 time=36.137 ms 64 bytes from 74.125.247.128: icmp_seq=3 ttl=56 time=19.932 ms 64 bytes from 74.125.247.128: icmp_seq=4 ttl=56 time=19.043 msLook for the
time=values in the output. These represent the latency in milliseconds. It's best to consider the average or a typical value, rather than a single value.Verify latency: For the best video quality, ensure your latency is less than 100 ms to the nearest Google endpoint. If your latency consistently exceeds this threshold, it could negatively impact your video conferencing experience.
Network routing
You can use the traceroute command to trace the network path to Google's
endpoints. This helps identify potential bottlenecks or unnecessary hops. Run
the following command from a computer on the same wired network you'll be using
for video conferencing:
> traceroute 74.125.247.128
This shows you the route your network traffic takes to reach a Google server. Ideally, you want to minimize the number of hops between your local network and your internet service provider (ISP). A large number of hops can indicate a less efficient route and potentially higher latency.
Another helpful tool to monitor hints of congestion is mtr, which behaves like
a more useful version of traceroute. This tool can help identify potential
problematic hops between the machine this is running on and the destination, to
help disambiguate between problems inside a corporate network and problems with
an ISP. Each hop is given averages and standard deviations on response time,
which can help to identify potentially congested links.
Here is some sample output:
                                                  My traceroute  [v0.96]
hostname ([example]) -> 74.125.247.128 (74.125.247.128)
Keys:  Help   Display mode   Restart statistics   Order of fields   quit
                                   Packets               Pings
Host                          Loss%   Snt   Last   Avg  Best  Wrst StDev
 1.  100.115.92.25             0.0%   195    1.0   0.6   0.2   2.0   0.3
 2.  192.168.4.1               0.0%   195    2.7   3.6   1.9   7.9   1.2
 3.  192.168.1.254             0.0%   195    4.2   3.6   2.5   9.9   0.9
 4.  [example]                 0.0%   195    4.3   4.5   3.0   8.3   0.9
 5.  76.197.98.82              0.0%   195    5.1   4.6   2.9   9.4   0.9
 6.  32.130.92.48              0.0%   195   21.2  23.2  19.9 360.4  24.3
 7.  32.130.20.60             80.0%   195   21.4  21.2  19.9  24.8   1.1
 8.  32.130.20.246            82.5%   195   21.7  21.5  20.4  24.0   0.9
 9.  32.130.26.105             0.0%   195   23.4  21.9  19.7  29.9   1.1
10.  108.170.231.46            0.0%   194   22.4  23.0  21.3  42.4   2.0
11.  142.250.231.183           0.0%   194   22.0  22.0  20.5  32.2   1.5
12.  74.125.247.128            0.0%   194   22.5  22.7  21.2  29.1   0.9
For mtr installation information, go to the link for your operating system:
Windows, Mac, Linux (usually installed using a package manager as
mtr package).