Je kunt een IP-adres of adresbereik binnen een domein opgeven en alleen berichten van die adressen toestaan. Deze functie wordt soms IP-vergrendeling genoemd.
Met IP lock kunt u het volgende:
- Al het binnenkomende verkeer van een bepaald domein op de witte lijst zetten
- Spoofing voorkomen door de toegestane IP-bereiken handmatig op te geven
IP-vergrendeling is handig voor domeinen die geen Sender Policy Framework-record (SPF) hebben of die apps van derden gebruiken om e-mails te sturen namens het domein.
U stelt IP lock in met de instelling Content-compliance. Je stelt IP-vergrendeling in 3 stappen in:
- Voeg het domein toe
- Het toegestane IP-bereik definiëren
- Stap 3: De juiste maatregel en Non-Deliverable Response (NDR) instellen
Lees meer informatie over hoe u regels instelt voor content-compliance.
Stap 1: Het domein toevoegen
-
Ga in de Google Beheerdersconsole naar Menu


 Apps
Google Workspace
Gmail
Compliance.
Apps
Google Workspace
Gmail
Compliance.Hiervoor is het beheerdersrecht Gmail-instellingen vereist.
- Scroll naar Content-compliance en klik op Configureren of Nog een regel toevoegen.
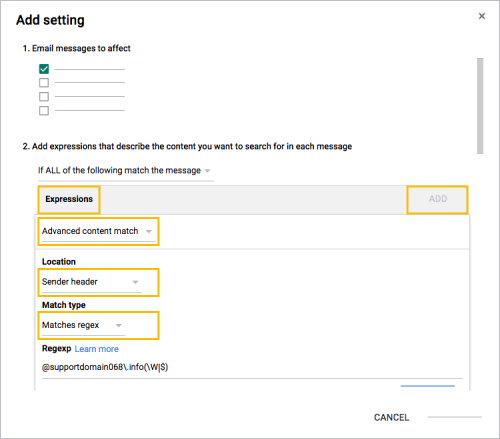
- Selecteer onder E-mailberichten waarvoor dit geldt de optie Binnenkomend.
- Selecteer Als AL het volgende overeenkomt met het bericht in het menu.
- Klik in het gedeelte Expressies op Toevoegen.
- Klik in het menu op Geavanceerde contentovereenkomst.
- Klik in het menu Locatie op Koptekst afzender.
- Klik in het menu Overeenkomsttype op Komt overeen met regex.
- Voer de domeinnaam in waarmee je IP-vergrendeling wilt gebruiken in de indeling @domein.com(\W|$), bijvoorbeeld: @google.com(\W|$)
- Klik op Opslaan.
- Laat de instelling Contentnaleving openstaan, zodat je hieronder nog een expressie kunt toevoegen.
Stap 2: Het toegestane IP-bereik definiëren
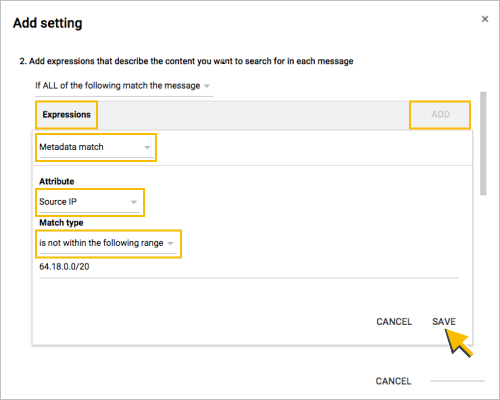
- Klik in de sectie Expressies op Toevoegen.
- Klik in het menu op Metadata-overeenkomst.
- Klik in het menu Kenmerk op Bron-IP-adres.
- Klik in het menu Overeenkomsttype op Bron-IP bevindt zich niet binnen het volgende bereik.
Voer in het veld onder het menu de overeenkomende IP-adressen in.
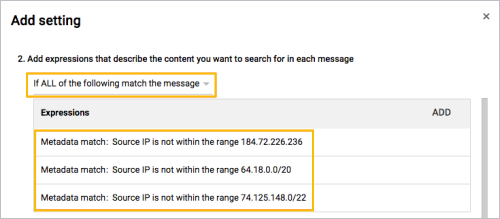
Opmerking: Het veld accepteert alleen bereiken in CIDR-notatie en afzonderlijke IP-adressen. U kunt maar één bereik per expressie invoeren, zoals in het voorbeeld in stap 7. Als je meer bereiken wilt toevoegen, klik je op Toevoegen om nog een expressie toe te voegen en herhaal je dit.
Klik op Opslaan.
Laat de instelling Content-compliance openstaan zodat u door kunt gaan met stap 3 hieronder.
In het volgende voorbeeld zijn meerdere IP-adressen opgenomen door meer expressies toe te voegen en de stappen hierboven te herhalen.
Stap 3: De juiste maatregel en NDR instellen
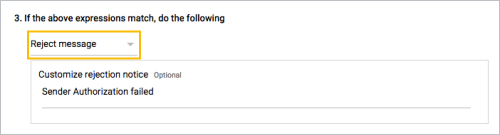
Als u alleen verkeer wilt toestaan van de IP's die u in stap 2 heeft gedefinieerd, selecteert u Bericht weigeren. U kunt ook tekst invoeren voor een aangepast afwijzingsbericht.